How to Print out your Printable Planners
Have you ever downloaded a great free Printable Planner but then run into problems printing it out?
Are you put off trying out Printable Planners because you're worried about printing them out?
If so, then let me show you exactly how to get the best result whatever you're printing.
Below you'll find the Printing Guidance I provide with all of the Printable Planner packs that I sell in my Etsy Shop.
They've helped to give me 100% 5 star reviews on my Printable Planners and so I hope they'll help you as well.
If you want to have a go at printing out your own planner inserts, there are lots of free printable options on the web for you to try out.
PDF Reader
You will need a PDF reader to open and print your printable. If you don't already have one installed on your computer you can download Adobe Acrobat Reader for free here
Just a quick heads up: Most of my files can be saved and printed as often as you like but can't be copied or edited as they're password protected.
To get started, download & open the file you want to print out. You can choose to print the whole file or just selected pages.
Please note: These instructions have been written based on my beloved Canon MG4200 series printer. This does everything I need it to do (including double sided printing) and always gives great results. I'd recommend it if you're after a new printer.
Your printer may well be different and some of the commands may be in a different place. Some printers may also not have all the selections referred to below. Always read your printer instructions or on-line guide if you are unsure.
Paper
I recommend that you use paper that is 100 gms or greater – particularly if you want to print double sided or for pages that you will refer to many times (e.g. Monthly planners).
This will stop the print “leaking” through to the other side (I use 120 gms in my A5 planner and they look good all year.)
For one-off pages like To Do lists, reminders, etc that you will only use a couple of times then any standard copier paper would be fine.
Punching Holes
All pages have a wide margin at each side of the page so you have room to punch holes to fit the pages into your planner. This also means they can be fitted on either the right or left side of the planner as you go along.
Hint: I’ve a whole post on the simplest way to hole punch out your new Printables
Sizing
My printables have all been designed as either A4, A5 or Letter sized. To get the best result download the file of the size that you want and make sure you choose actual size when printing.
You can resize any of the printables to use on other sized paper however the margins at the sides and top and bottom of the pages will change slightly – instructions for doing this are included in this guide.
To Print at Actual Size
(Example uses an A4 download)
Select the download for the size you want to print – A4, A5 or Letter.

Open up your product from wherever you have saved it to. Select File print or click the printer icon on the toolbar.
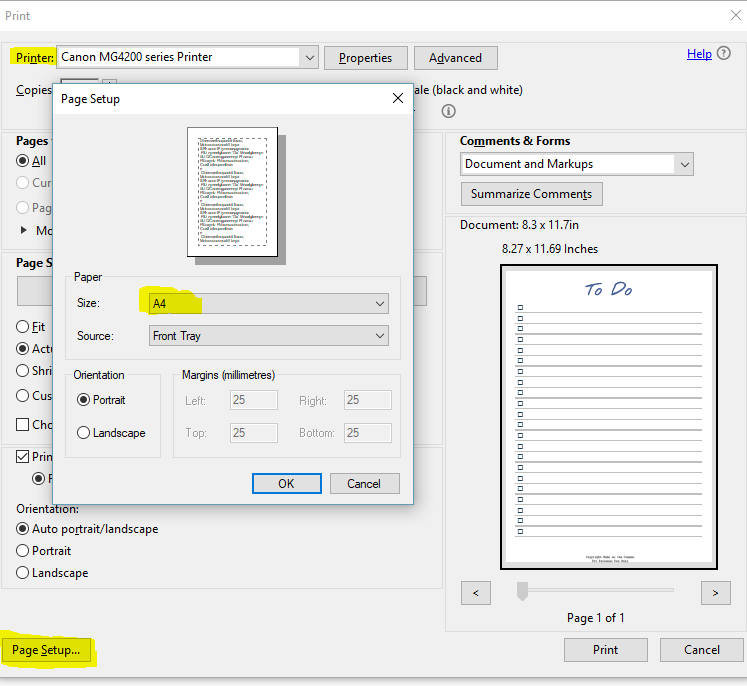
On the printer menu:
Make sure you have the right printer selected
Check you have the right paper size selected (click Page Setup and choose A4, A5 or Letter on the pop up screen)
Back on the front screen make sure that Actual size is highlighted
Check the print looks ok in the preview and then select Print.
ALWAYS PRINT A TEST PAGE BEFORE PRINTING OUT A LARGE DOCUMENT – ESPECIALLY IF YOU WANT TO PRINT ON BOTH SIDES OF THE PAPER.
Printing A5 Printables
I RECOMMEND THAT YOU USE A5 PAPER THAT HAS ALREADY BEEN CUT TO SIZE. This can be bought at most stationery shops or you can buy a ream of A4 paper and have it cut down (Staples and Office Depot do this for a minimal charge)
For instructions on how to print 2 A5 pages side by side, see below.
To print at Other Custom Sizes
(Example given is printing in A5 from an A4 Printable but this equally applies to 1/2 letter from Full Letter printable)
Open up your product from wherever you have saved it to. Select File and print or click the printer icon on the toolbar.
On the printer menu:
Make sure you have the right printer selected
Change the paper size to one of your choice (E.g. A5 - click Page Setup and choose A5 on the pop up screen)
On the first screen select “Fit” under Paper Sizing to shrink the page to the right size (On the right hand side of the screen you will see that the scale has now changed)
Check the preview looks ok and then select Print

ALTERNATIVE: To Print 2 A5 (or ½ letter) pages on 1 piece of A4 (Letter) paper
You can print two sheets per page through Reader. This is useful when single sided or many copies of the same sheet at once. It should be used with caution if you want to print 2 –sided as it can be tricky to get the right front with the right back (trust me – I’ve been there!!)
Select your Printable download and open the file.
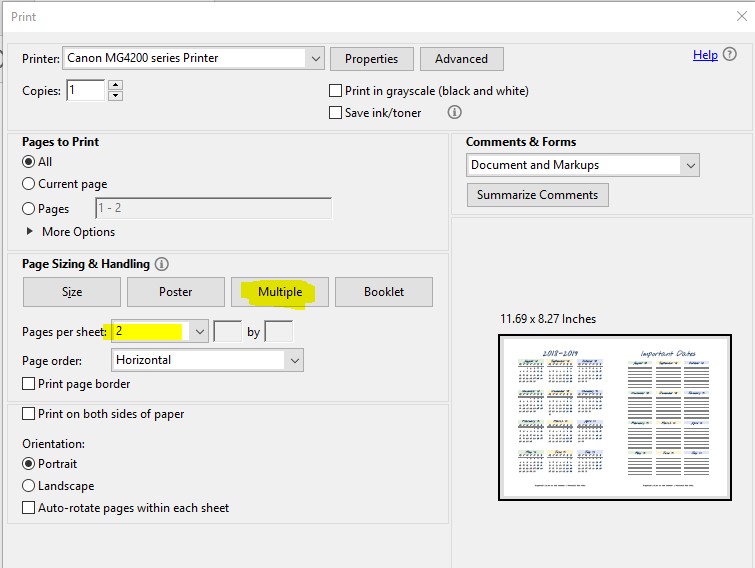
On the printer menu:
Make sure you have the right printer selected
Check you have the right paper size selected (click Page Setup and choose A4 (or Letter) on the pop up screen)
Under Paper Sizing, click Multiple and then choose 2 Pages per Sheet
Now your pages will print two to a page, side by side.
You can then cut them down to size and punch as required.
If you have any other questions or concerns or if your pages still won’t print out correctly please let me know and I will do my very best to sort you out.
Happy Printing!
Sarah x


Why not Pin this so you can come back to this article later?