How to Schedule Pins for Free - Step by Step Guide

UPDATE : The information in this blog post is now out of date and no longer applicable.
If you read my post on How to Automate your Business - for Free , you'll know that I'm a huge fan of IFTTT and use it every day to schedule pins for Free onto Pinterest.
Since I worked out how to use IFTTT, I've increased my monthly views on Pinterest from 8k a month to over 120k (and growing) in a few short weeks, and it's all thanks to the Pinning system I've set up using IFTTT. If that wasn't enough to convince you to keep reading, did I mention that it's totally free to use?
I think I schedule around 150 pins a week and am adding more every day. Without a scheduler to help me out, I'd be permanently attached to Pinterest and staying up all night to pin when my followers are active.
One of the downsides of living in the UK is that most of my audience is awake once I'm tucked up in bed and I've never been great at staying up late.
How to Schedule Pins with IFTTT
I'm going to walk you through how to get started with IFTTT and schedule your first pin.
You might also like: Why Free Resources are key to your new Business
Be warned - this 1st one will take a while and you might wonder if it's not faster just to pin manually. To be perfectly honest, for the first few you set up it probably is. The beauty of this method though is that once you've been through this hard work once, you can add more pins in minutes. You'll then build up a library of pins that will post when you want them to, where you want them to and all without it costing you a penny.
If you haven't already read it, I recommend going back to My "How to Automate" post for a quick read to get an idea of how IFTTT works and the difference between Applets and Services.
Trust me - it'll be worth it in the end - so let's get started.
A Plain English Version of how to Schedule your Pins
We're going to use Google Calendar as your Pinterest scheduler and set up a connection between your Calendar and Pinterest.Whenever a certain event happens in your Google Calendar, a new pin will be pushed to Pinterest. The "event" that triggers the post through IFTTT, is a certain phrase (or code) appearing in your Calendar.We then use 3 parts of your calendar "appointment" to hold the information about the pin.
Title - to hold the link to your website / blog post / etsy listing
Location - to hold the location of your photo & to hold the code that tells Ifttt which board to post to
Notes / Description - to hold the text description and hashtags for your pin
I know you're eager to get going but before we launch into IFTTT, there are a couple of other things we need to have set up first.
Google Calendar

Google Calendar
To use Google Calendar, you 1st need to create a Google Account (if you don't already have one).
This is really quick and easy - and totally free to do.Just go to Google then click Sign In in the top right-hand corner of the screen.
Choose your Google account or Add Account if you don't have one and get set up.Sign into your account, click the 9 dot grid in the top right and choose the calendar icon.I recommend that you set up a new calendar that you keep solely for your Pinterest pins.
This way you can choose when to look at your Calendar, and it won't get mixed up with all your other appointments. I call mine MOTC Pinterest.Simply
Click the Create button when you are in your Calendar to make a new one.
Save your Pin Image somewhere you can access it.
I load all of my pin images onto my website into the media library. Don't worry about inserting them all into the blog post that you want to direct readers to. As long as the image is somewhere on your websites' media library, IFTTT will find it.If you have an Etsy shop and don't have a website then you can link to any of the images that are attached to your product listing.
Setting up your IFTTT account
IFTTT Front Screen
Right, we're all set to get IFTTT working!Go to https://ifttt.com/ , enter your e-mail and click "Get Started"Important: Make sure you use the same E-mail that is connected to your Pinterest account.Choose a Password and then click Sign InYou'll see a screen like this:These are all the "Services" that IFTTT can connect to. It doesn't really matter what you choose to start with, but as we're here to talk about scheduling pins to Pinterest I suggest you click the ones we are going to use:
Google Calendar
Google Drive
Unfortunately, Pinterest isn't an option, so choose anything else you recognise as your 3rd choice.
Then hit Continue
You then get a screen "Introducing Applets" - just hit the X to skip this step.
Creating your 1st Applet

Pinterest Applet
In case you've forgotten:
Applets connect Services together
We want to create an Applet to connect together our Google Calendar and Pinterest.The great news is that someone has already created this for us so we can simply make a copy of their Applet and then edit it to work for our Pins.Using the Search bar, type "Schedule pin on Pinterest" and then select the Blue box titled "Schedule Posts to Pinterest"This will bring up this Applet by amgedosman
Click "Turn On"You now need to give permission to IFTTT to connect to your Google and your Pinterest accounts.Sign in to each account and give permission to IFTTT. Don't worry, you only have to do this once as it will remember your access next time.
Configuring the Applet
To make the Applet work for your Pinterest Account, we need to edit it so it will pin correctly - don't worry, this sounds scarier than it is!!
Be Warned: You need to create an Applet for every board you want to post to - truthfully, this is really tedious and takes a while but it's a one time job. Once you have this set up it's really quick and easy to schedule as many pins as you want to that boardYou now need to tell IFTTT which calendar you want it to look at.If you only have one set up in your Google Account then that one will be displayed. If you made a special one just for this task at the start of this process, you can select it in the drop down box.
Mine is called MOTC Pinterest.
Click Save
You will get a message saying that your Applet is now Active but you need to make some more changes before you can use it.Hit "My Applets" at the top of the page and you should see your new Applet displayed.Click on it to open it up and you will see a small wheel icon (Edit) at the top right of the blue box. Click this to open it up.
Editing your Applet

Editing Applet 1
This is where the magic happens!!
Name: You can now change the name from "Schedule Posts to Pinterest" to something meaningful for you. I like to include the board name and the code / phrase I use in the trigger so I know exactly what each Applet does.
Event from Search Starts
Keyword / Phrase: This is the magic that "Triggers" the post to happen. A pin will post every time you have a calendar event containing this code / phrase.You need to assign a different code for every board you want to post to so keep a list somewhere of what they are - I use a Spreadsheet for this. Keep it simple - I use #motc and then add a number to the end. 001, 002 etc . This way I can set up 999 Applets using the same format (that covers 999 boards!!)Time before Event: Leave the minutes before as 0 - you want the pin to post at the date and time set in your calendar.
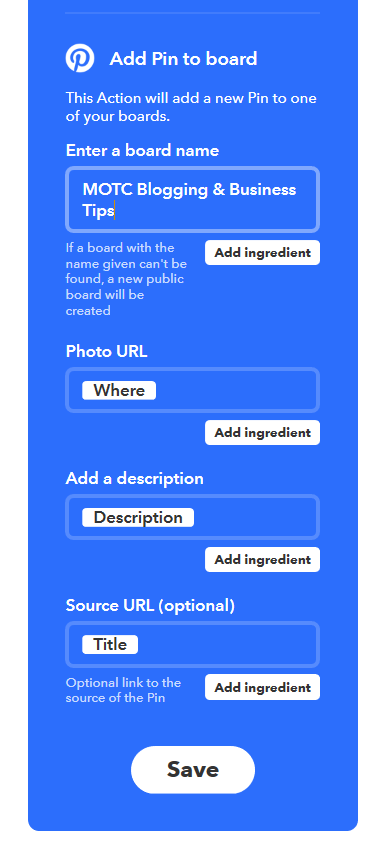
Add Pin to Board
Editing Applet 2
This is where you tell IFTTT where to post your pin and what to post.
Enter board Name - delete what is already there and copy in the name of your chosen board.Important: This must be EXACTLY as it is written in Pinterest (Capitals, spaces, dashes etc) so it is best to copy and paste directly from Pinterest into this box or it won't work and a new board will be created.
Photo URL - leave unchanged as Where. This will link to the Location field in your Calendar event
Add a Description - Leave unchanged as Description
Source URL (optional) - This is not Optional but very important, as this provides the link back to your blog post / website / etsy listing etc.
Delete what is in the box, click Add Ingredient, and choose Title. This will then use whatever is in the Title of your Calendar event as your destination for your Pin.This will first appear with wavy brackets around the name but if you click out of the box will change to black type in a white box.
Now Click Save - Congratulations - your 1st Applet is ready to use(Once you have created an event in your calendar, that is!)
Creating your Event in your Calendar

ifttt calendar event
The final step in this mammoth task is to put something in your calendar to be posted.
Open up your Calendar and pick a time for your first post. To test that everything is set up correctly, I recommend picking a time around 15 minutes from whenever you are doing this.
You can then check whether it all worked as expected
Title - copy in the link to your website / blog post / etsy listing
Location - copy in the link to the image you want to pin THEN leave a space and type in the code / phrase that you set up in your Applet. For mine it was #motc100Description - type in the text & hashtags that you want to show up in Pinterest under your pin.
Click save then wait...….After your set time you can hop over to Pinterest and see if your pin appears. Be warned - it can take up to 15 minutes after the time you set before it appears so be patient.
Another way to check if the Applet has run, is by going into IFTTT and looking at the Activity tab. You should see a notification saying Applet Run or possibly Applet Failed if something went wrong.
What Next?
OK, so if you are reading this I am assuming that you haven't given up and signed up for a monthly plan with Tailwind.Congratulations for making it this far and scheduling your first pin.Hooray!! - Your Hard work is done.What Makes IFTTT really powerful is what you do next...You now need to duplicate what you have done. The good news is that this is much easier.
Add more Pins to your Calendar
You can now create multiple calendar events for all the pins you want to schedule to that board.Add a new event, complete the Title, Location and Description - not forgetting to add your code to the Location, choose a time and Save.Keep repeating for as many pins as you want, as often as you like.

IFTTT Calendar
Duplicate your IFTTT Applet
You need to create a new version of the Applet for each board you want to post to - using a different code for each one.
To do this click on the one you have set up, scroll to the bottom and click "Start" under "create a different Version of this Applet"You need to edit the details again as before and make sure you change the title so you know which one posts to which board.Remember: you need a unique code for every board you want to post to so keep a list somewhere safe.
See your Growth in Pinterest
It's great to wake up in the morning and see all the pins that posted to your boards overnight and even better to check your analytics as your engagement numbers soar.That's it - you made it
Happy pinning
Sarah x


